Unlock Touch Interaction: The TFT Touch Screen with Arduino for Intelligent Embedded Projects
Unlock Touch Interaction: The TFT Touch Screen with Arduino for Intelligent Embedded Projects
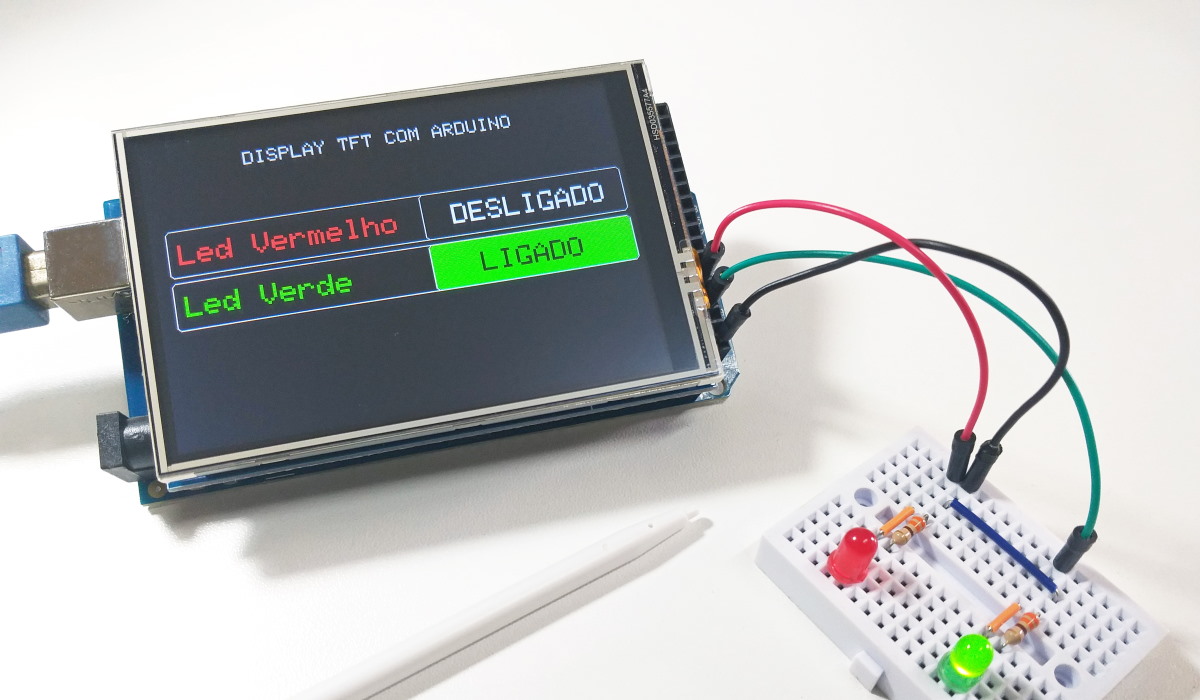
For makers, engineers, and hobbyists seeking an accessible, versatile platform to bring interactive touch-based interfaces to life, the TFT touch screen paired with Arduino technology delivers unprecedented flexibility and power. This comprehensive guide reveals how integrating TFT capacitive touch displays with Arduino-based microcontrollers revolutionizes prototype development—bridging user-friendly design with robust programmability. From wiring schematics to code examples, the TFT touch screen-Arduino ecosystem empowers creators to build responsive smart devices, interactive kiosks, educational tools, and automation controls that are both intuitive and reliable.
At the core of this integration lies the TFT display—specifically resistive or capacitive touch-enabled screens capable of high-resolution grayscale rendering and smooth responsiveness. When combined with Arduino boards such as the Arduino Uno, Nano, or more powerful JeeTable or Pico clusters, developers gain full control over display initialization, touch event detection, and real-time interactivity. Unlike off-the-shelf touch panels requiring proprietary drivers, TFT modules with Arduino output seamless compatibility, enabling rapid iteration and open hardware customization.
Key Components and System Architecture
- TFT Touch Screen Modules: These devices typically feature 128x160 (RGB/Grayscale) to 480x320 pixel matrices, built on a capacitive or thin-film resistive layer.
Popular variants include 24x32mm and 48x64mm panels popular for compact projects. The resistive type supports bare fingers; capacitive models require light touch or stylus input, offering better multitouch support.
- Arduino Microcontroller Platforms: The Arduino ecosystem offers scalable power—from micro 28-pin boards ideal for simple touch UI projects, to advanced models like Arduino Zero (ARM Cortex-M4) or ESP32-WROOM integrated with touch controllers. These platforms support embedded gesture recognition, haptic feedback, and real-time processing with minimal latency.
- Touch Controller ICs: Crucial to signal processing, I2C-based touch controllers such as WAC1883 or capacitive-controller ICs (e.g., Folic TPS610 from TouchSensor) handle capacitive sensing, noise filtering, and multi-finger detection.
These ICs decode touch events directly, reducing load on the main microcontroller.
Building a functional system starts with hardware assembly: mounting the TFT screen via adhesive or custom PCB substrata, connecting the touch controller to Arduino GPIOs or I2C buses, and routing power and ground traits cleanly. Proper layer isolation prevents electrical interference—critical for accurate touch sampling at 100+ Hz refresh rates. Shielding sensitive analog touch signals from digital noise ensures pixel-level accuracy during user interaction.
Wiring and Interface Configuration
For most embedded setups, interfacing begins with selecting a compatible touch controller IC. The WAC1883, for example, operates via I2C (SDA/SCL lines), allowing Arduino connectivity with minimal pin usage. Installation involves common-cathode LED grid disconnection, solid alignment of signal traces, and pull-up resistors at SDA/SCL≥4.7kΩ to stabilize communication.Power is supplied through 3.3V or 5V regulated rails—depending on controller specs—to prevent signal degradation. Once hardware is secured, initializing the display requires library integration. The Adafruit_SSD1306 (with touch support) is widely used, supporting touch_DATA defaults and direct pixel manipulation.
Right after, the sensor driver sets up touch coordinates via interrupts or polling, with thresholds calibrated for screen resolution and touch thresholds.
For responsive interaction, mounting the Arduino in a stable enclosure while calibrating touch zones ensures accurate feedback. Using `onTouchStart` and `onTouchMove` callbacks, developers program immediate visual responses—such as highlighting buttons, navigating a menu, or adjusting sensor values—without lag.
This low-latency interaction forms the foundation of intuitive user experiences.
Software Development and Interactive Applications
Arduino sketches serve as the brain of the interface, orchestrating touch inputs and output rendering. A typical flow includes initializing the display, setting touch parameters, and entering an interactive loop. Libraries like `TFT_eSPI` provide convenient API calls for drawing menus, drawing movable icons, and binding gestures (pinch, swipe) through gesture recognition extensions.For instance, a simple interactive quiz application could detect touch positions, trigger next-question transitions, and animate feedback using incremental drawing commands. More sophisticated projects integrate sensor fusion—combining touch with accelerometer or ambient light input—to adapt behavior contextually. For example, a sunlight-sensitive smart desk could highlight interactive zones based on real-time light data and touch location, enhancing usability.
Real-world example: A classroom digital display using a 48x64 TFT with a 48-pin Arduino Nano processes student input through calibrated touch zones, dynamically updating lessons, animations, and quiz progress. Responsive touch delay under 80ms ensures seamless engagement, while touch event filtering maintains reliability during group use. This demonstrates the practical edge of embedded touch systems combining cost-effectiveness with high usability.
Design Considerations and Best Practices
Success hinges on thoughtful design: screen orientation, touch region sizing, and intuitive feedback.Multi-touch layouts must distinguish gestures accurately—implementing debouncing and thresholds prevents unintended inputs. Power management, especially in battery-operated deployments, benefits from sleep modes triggered by inactivity, prolonging operation. Calibration becomes critical with varying screen resolutions and touch controller resolutions.
Calibrating pixel-to-touch coordinate mappings ensures consistent behavior across panels and use cases. User testing illuminates ergonomic gaps—such as button placement or touch target size—aligning hardware with human interaction patterns.
Additionally, embracing open-source firmware and modular code structure enables scalability.
Projects can evolve from single-display prototypes to multi-screen networks, supporting complex applications like home automation dashboards or interactive museum kiosks. Version-controlled repositories and community libraries accelerate development, fostering collaboration and knowledge sharing.
Applications Across Industries and Innovation Frontiers
The integration of TFT touch screens with Arduino extends beyond simple prototypes into diverse domains: retail self-service kiosks, medical diagnostic stations with sanitized interfaces, agricultural field monitors with rugged durability, and educational tablets for children. Each domain demands tailored implementation—temperature-resistant enclosures for outdoor use, gloved finger compatibility in industrial settings, or low-power modes for off-grid operation.Emerging trends point toward edge-AI integration, where lightweight on-device inference enhances touch interaction—such as voice-guided touch prompts or adaptive UIs learning user preferences. The low-cost, open nature of the platform fuels innovation, enabling startups and educators to prototype high-impact solutions without enterprise budgets.
Whether building a smart classroom tool or a resilient industrial interface, the TFT touch screen with Arduino represents a balanced fusion of accessibility and power.
Developers gain a programmable canvas fully within open hardware philosophy, empowering continuous iteration and creative freedom.
The Future of Interactive Embedded Systems
The insights explored — hardware precision, software control, and application versatility — underscore why TFT touch screens paired with Arduino stand at the forefront of interactive embedded design. As microcontroller capabilities grow and display technology advances, this combination remains a resilient foundation for next-generation user interfaces. From hobbyists crafting inventive gadgets to professionals shaping mission-critical devices, the TFT touch screen gets Arduino into every hand, one line of code and screen at a time.This guide illuminates not just how to connect components, but how to craft experiences—touch by touch, project by project.


Related Post

Xavi Simons Girlfriend: A Behind-the-Scenes Look at the Rising Star’s Personal Life

Revolutionizing Classroom Engagement: How 05Konz Blooket Transforms Learning with Gamified Quizzes

OSCSEPSI, IGCSESC, and Truck Financing: Breaking the Barriers to Heavy Equipment Acquisition
Unlocking Headshot Mastery in PUBG Mobile: The Definitive Guide to Killing on First Shot